


Product descriptions in a Shopify CSV live in two places: the Body (HTML) column, which holds the full product page copy and accepts HTML markup, and the SEO description column, a separate 320-character field that defaults to Body (HTML) when left blank. To update either field, export your products first to capture the correct Handle values, edit the CSV, then re-import and tick “Overwrite products with matching handles.” Headers must match Shopify’s own sample file exactly, case included, and the file must be saved as UTF-8.
TL;DR:
- Using the correct and exact header names, especially casing, is crucial to prevent import errors in Shopify CSV files.
- Always save your CSV as UTF-8 and wrap punctuation-heavy fields in quotes to avoid data shifting or corruption during import.
- Editing only the Body (HTML) and SEO description columns after exporting minimizes errors, but do not alter the Handle to avoid creating duplicates.
- Description failures often stem from misaligned headers, incorrect encoding, or unescaped characters, which can be fixed with small test imports.
- Tools like Merchup AI can streamline bulk description updates by visual preview and direct Shopify publishing, reducing manual CSV errors.
Where to find Shopify’s sample CSV and which columns you actually need
Shopify publishes an official sample CSV with every column it recognises already laid out in the correct order. Download it before you touch a single description. Building your own file from scratch, or copying an old export from a different store theme, is the single fastest way to end up with a header row Shopify’s importer rejects outright.
You don’t need every column the sample file contains. Shopify only requires a handful to process an update successfully, and the rest can stay blank if they don’t apply to your catalogue.
For description edits specifically, keep this shortlist in front of you:
- Handle — the unique identifier that links every row to an existing product; get this wrong and you create a duplicate instead of updating the original.
- Title — the product name; leave it exactly as exported unless you’re deliberately renaming.
- Body (HTML) — the main product description, HTML allowed.
- SEO description — the meta description shown in search results.
- Image Src — the URL Shopify uses to fetch product images.
- Variant SKU — only needed if you’re touching variant-level data alongside the description.
The header line itself has to read exactly as Shopify formats it: Handle,Title,Body (HTML),Vendor,Type,Tags,Published,Option1 Name,Option1 Value... and so on, character for character. A missing space, a lowercase “h” in “Handle,” or a stray column Shopify doesn’t recognise will throw off the entire import, not just the row you meant to edit.
Body (HTML) versus SEO description: what each field is actually for
These two fields do different jobs, and confusing them is where most description edits go wrong. Body (HTML) is what a customer reads on the product page. SEO description is what a searcher reads in Google’s results, capped at 320 characters, and if you leave it blank Shopify quietly pulls text from Body (HTML) instead, stripping out the tags in the process, according to Shopify’s own CSV documentation.
That fallback behaviour catches a lot of merchants out. If your Body (HTML) opens with a bulleted spec sheet rather than a proper sentence, that’s what shows up in the search snippet unless you write a dedicated SEO description. Writing a short, purpose-built meta description rather than relying on the fallback is worth the extra few minutes, and it’s a habit worth building into every product description SEO workflow.
Body (HTML) supports standard tags reasonably well: <p>, <ul>, <li>, <strong>, <em>, and basic headings. What it doesn’t handle well is anything you’d expect from a full web page: <script> tags, complex inline CSS, or nested div structures pasted from a word processor. Shopify doesn’t sanitise or validate this HTML the way a proper content management system would, so a broken tag doesn’t throw an error. It just renders badly on the live page, and you often won’t notice until a customer does.
A few formatting habits keep this field clean:
- Write short paragraphs wrapped in
<p>tags rather than one dense block. - Use
<ul>and<li>for feature lists instead of manually typed dashes or asterisks, which Shopify won’t render as bullets. - Strip formatting pasted from Word or Google Docs before adding tags. That formatting carries invisible characters that can corrupt the cell.
Pro Tip: If your description contains a comma, semicolon, or a quotation mark, wrap the entire cell in double quotes before saving. Spreadsheet software usually does this automatically, but if you’re hand-editing a CSV in a plain text editor, forgetting the quotes is what causes Shopify to read one description as three separate columns.
Avoid manual line breaks inside a description cell unless your spreadsheet software encodes them properly within the quoted field. An unescaped line break can split a single row into two, shifting every column after it and corrupting data for the next several products in the file.
Encoding, headers and the formatting mistakes that break imports
Most description import failures trace back to one of three causes: a mismatched header, the wrong file encoding, or an unescaped character sitting inside the description text. None of these are hard to fix once you know what to check.
- Confirm the header row matches exactly. Copy the header line straight from Shopify’s sample file rather than retyping it. “handle” and “Handle” are not the same column to Shopify’s importer, and this single casing error is one of the most common reasons an otherwise correct file gets rejected.
- Save as UTF-8, every time. Accented characters, curly quotes, and certain symbols in product descriptions can turn into garbled text or question marks if the file isn’t saved in UTF-8 encoding. Most modern text editors let you choose the encoding explicitly in the save dialogue. If you’re not sure which encoding your spreadsheet app defaults to, check it manually before uploading.
- Use the CSV export option built for spreadsheet tools. If you’re editing in Excel or Numbers, choose “CSV for Excel, Numbers…” (or your software’s equivalent UTF-8-safe export) rather than a generic “CSV” save. Standard CSV exports from some spreadsheet tools default to a different encoding that Shopify can misread.
- Wrap punctuation-heavy fields in quotes. Any description containing a comma or semicolon needs the entire cell wrapped in double quotation marks, or Shopify’s importer will treat that punctuation as a new column boundary. Shopify’s own troubleshooting documentation flags unescaped punctuation as one of the most frequent causes of shifted or corrupted rows.
- Test a small batch before the full file. Once you’ve made these checks, import five or six rows first. If they land correctly, the format is sound and you can safely run the rest.
How to edit descriptions safely: export, edit, import
The safest way to change existing descriptions is never to write a fresh CSV from scratch. Export what already exists, edit only what needs changing, and import it back over the top.
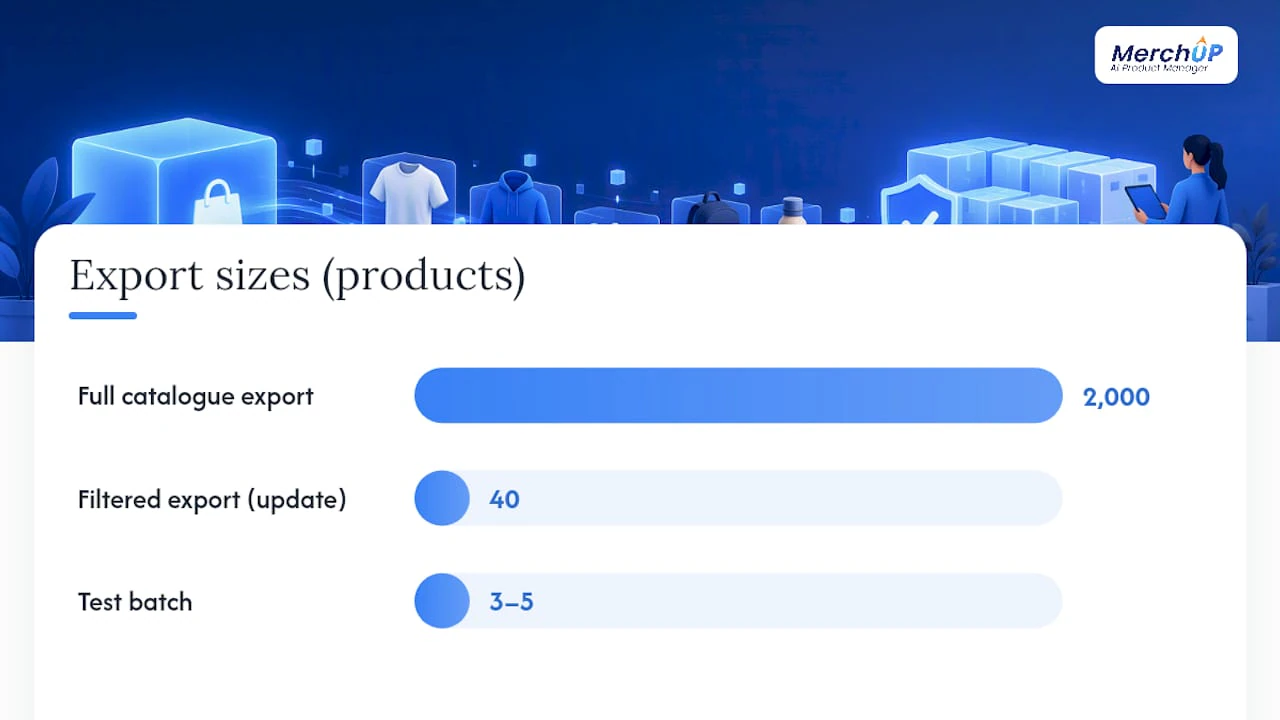
Shopify lets you filter your export rather than pulling your entire catalogue every time. If you only need to update descriptions on 40 products out of 2,000, export just those 40 using a collection filter, a tag filter, or a manual selection. A smaller file is faster to edit, easier to check by eye, and far less risky if something goes wrong.
Whatever you do, don’t touch the Handle column. This value is what tells Shopify which existing product a row belongs to. Change it, and the import stops updating your product and starts creating a new one instead, duplicating the listing and leaving the original untouched.
Once your edits are done, the import screen presents a checkbox: “Overwrite products with matching handles.” This is the step that actually applies your description changes rather than treating the file as new inventory to add. It’s also the point of no easy return; there’s no single undo button once an overwrite import finishes, as Shopify’s own guidance notes.
That’s exactly why testing matters before you commit to a full-catalogue run:
- Import a batch of three to five products first and check the results in the admin before scaling up.
- Run the full test on a development store if you’re changing hundreds of listings at once, so a mistake never touches your live storefront.
- Keep the original export saved untouched as a backup, separate from the file you’re editing.
Handling image URLs alongside description updates
Description edits often happen alongside image swaps, and the same CSV row handles both. The Image Src column needs a direct, publicly accessible URL that Shopify’s servers can reach and download. If that link is broken, private, or behind a login, the image simply won’t import, and the row won’t throw an obvious error to warn you.
Avoid pointing to filenames that include suffixes like _thumb, _small, or _medium. These usually indicate a resized or temporary asset rather than the final, stable file, and using them risks a low-resolution image landing on the live product page.
Fill in the Image Alt Text column every time you touch an image row. It matters for accessibility, since screen readers rely on it, and it feeds into image search visibility. Keep the wording descriptive and specific: “Navy cotton crew neck t-shirt, front view” beats a generic “product image” every time.
One distinction worth remembering: descriptions sit at the product level, tied to the Handle, not to individual variants. Variant images are handled separately in their own rows, but the Body (HTML) and SEO description fields only need to appear once per product, not repeated on every variant line.
Why does my Shopify CSV import fail with description errors?
Most description-related import failures fall into a handful of repeat offenders, and each has a specific fix rather than a vague “try again.”
- “Network error: Unexpected token < in JSON.” This almost always points to a header row problem, usually a casing mismatch, according to reports in Shopify’s own community forums. Recheck every column name against the sample file before doing anything else.
- Garbled or replacement characters in the description. This is a UTF-8 encoding issue almost every time. Re-save the file with UTF-8 encoding explicitly selected and re-import a single test row to confirm the fix worked.
- Extra columns or rows that don’t line up. Look for an unescaped comma or semicolon sitting inside a description cell that wasn’t wrapped in quotes. One stray comma shifts every value after it one column to the right.
- Body (HTML) shows blank in your export, even though the admin displays a description. Double-check your export settings, since descriptions are product-level data that should always appear as the third column in a standard export, per Shopify community troubleshooting threads. If it’s genuinely missing after a correct export, that’s worth raising with Shopify Support directly.
- The import fails partway through. Shopify generates a downloadable error file listing exactly which rows failed and why. Fix only those rows and re-import that smaller file rather than starting over from scratch.
A practical checklist for editing descriptions at scale
Bulk description edits go wrong less often when the process is boring and repeatable rather than clever. A few habits, applied consistently, catch nearly every mistake before it reaches your live store.
Start every batch update with a small test, three to five products is plenty, rather than committing your whole catalogue on the first attempt. If those rows import cleanly and the descriptions render the way you expect, you’ve validated your header row, your encoding, and your HTML in one pass.
Preview your Body (HTML) before it goes live, not after. Pasting raw HTML into a spreadsheet cell is where most rendering mistakes happen, because a spreadsheet gives you no way to see whether that <ul> tag will actually produce a bulleted list. A visual editor that shows you the rendered output before publishing removes that guesswork entirely, which is one reason teams managing large catalogues increasingly lean on tools built for the job rather than raw CSV editing.
A few more habits worth locking in:
- Always keep an untouched backup of your original export before you start editing.
- Never alter the Handle column on rows you intend to update.
- Write SEO descriptions as their own field rather than relying on the Body (HTML) fallback, keeping them under 320 characters for a clean search snippet.
- Log which products you’ve updated and when, especially across large catalogues, so a failed batch is easy to trace back.
Pro Tip: Run your test batch on a Friday afternoon in the admin, not a Monday morning during peak traffic. If something renders oddly, you’ll have time to fix it before your busiest browsing hours roll round.
Manual HTML or templates: how to decide what’s worth the effort
Rich Body (HTML), proper headings, bulleted specs, a bit of narrative, earns its place on higher-margin or flagship products where a customer is genuinely reading before buying. For the long tail of a catalogue, a clean, templated structure with a punchy SEO description usually does more for conversion than an artisanally crafted paragraph nobody scrolls to the bottom of.
Automation earns its keep at volume: hundreds of near-identical variants where the pattern is repeatable and human review adds little. Manual curation still wins on anything customer-facing and high-stakes, a hero product, a seasonal launch, where getting the tone wrong costs more than the time saved.
Scheduling matters more than most merchants admit. Never run a full overwrite import during peak trading hours, and always keep the pre-edit export somewhere you can find it fast. A CSV import has no built-in rollback, so your backup file is the rollback.
— Jamie Moss
A faster route to safe bulk description edits
Editing hundreds of Body (HTML) fields by hand in a spreadsheet is where most of the mistakes above actually happen, mismatched quotes, broken tags, a header casing slip nobody catches until the import fails. Merchup AI removes that step by generating, previewing, and publishing descriptions straight into your Shopify catalogue through a visual editor, so you see the rendered HTML before it goes live rather than guessing from a cell.

The platform’s templates and bulk-publish tools connect directly to your Shopify store, meaning updates apply without you touching a CSV file at all, and its SEO description handling keeps that separate 320-character field distinct from the main product copy rather than leaving it to Shopify’s automatic fallback. Plans start with Starter at £12.99 a month, scaling up through Growth, Pro, and Scale for larger catalogues needing higher-volume bulk publishing. If you’d rather see it in action first, the 30-second tutorial walks through generating and publishing a description end to end, or you can check plan details and credit allowances on the pricing page before deciding which tier fits your catalogue size.
Official Shopify documentation worth bookmarking
Shopify’s own help pages are the final word on exact column requirements and troubleshooting steps, and they get updated when the CSV format changes, so it’s worth checking them directly rather than relying on secondhand summaries.
- Using CSV files to import and export products — the sample file and full column reference.
- Importing products with a CSV file — the import workflow and the overwrite setting.
- Solutions to common product CSV import problems — header, encoding, and formatting fixes.
- Exporting products — filtered export options for editing subsets of your catalogue.
FAQ
Where do I put a product description in a Shopify CSV?
Put the main product copy in the Body (HTML) column, which accepts HTML tags, and use the separate SEO description column for the search-result snippet. If the SEO description field is left blank, Shopify automatically pulls from Body (HTML) instead.
How long can a Shopify SEO description be?
The SEO description field supports up to 320 characters. Anything written beyond that limit gets cut off in Shopify’s product CSV format, so keeping it concise and front-loaded with the key selling point matters more than filling the full allowance.
Can I update just the descriptions without changing anything else?
Yes. Export your products to get the correct Handle values, edit only the Body (HTML) or SEO description columns, then re-import and select “Overwrite products with matching handles”. Leaving the other columns untouched from the original export keeps the rest of the product data unchanged.
Why does my CSV import fail with a JSON error?
That error almost always points to a header row that doesn’t match Shopify’s required casing, such as “handle” instead of “Handle.” Recheck every column name against Shopify’s sample file before re-uploading.
Does Shopify treat description edits at the product or variant level?
Descriptions are product level, tied to the Handle rather than to individual variants, so you only need to write them once per product row. Variant-specific data like SKU or pricing sits in separate rows, but Body (HTML) and SEO description don’t repeat across them.
What’s the fastest way to bulk-edit descriptions without breaking a CSV?
Testing a small batch of three to five products first catches most header, encoding, and HTML errors before they touch your full catalogue. Tools like Merchup AI’s visual editor let you preview the rendered HTML and publish directly to Shopify, which avoids the spreadsheet formatting mistakes that cause most CSV import failures.


Comments
No comments yet — be the first to share what you think.